A successful bathroom renovation strikes an enduring balance between daily comfort and long-term property equity. Whether you are dealing with a cramped hallway bath or reconfiguring an outdated primary suite, the right layout choices and material selections directly influence how much value you recapture when it comes time to sell.
Upgrading a residential bathroom consistently ranks among the top home improvement projects for overall return on investment. However, achieving substantial financial returns requires looking beyond quick cosmetic fixes. Lasting equity gains stem from certified waterproofing systems, intelligent spatial planning, and timeless fixture selections that withstand daily humidity and continuous wear.
This comprehensive guide breaks down actionable, high-impact bathroom remodel ideas, realistic 2026 cost expectations, spatial strategies for compact floor plans, and the step-by-step construction workflow required to execute your project without expensive structural mistakes.
The Anatomy of a High-ROI Bathroom Remodel
A high-return renovation rests on three foundational pillars: layout efficiency, moisture management, and neutral, high-durability finishes.
┌─────────────────────────────────────────────────────────────┐
│             The 3 Pillars of High-ROI Remodeling            │
└─────────────────────────────────────────────────────────────┘
          │                         │                        │
          ▼                         ▼                        ▼
┌───────────────────┐     ┌───────────────────┐    ┌───────────────────┐
│ Layout Efficiency │     │ Moisture Defense  │    │ Durable Finishes  │
│ Keep wet walls    │     │ Solid sheet or    │    │ Porcelain tile &  │
│ intact to reduce  │     │ liquid-applied    │    │ engineered quartz │
│ plumbing expense. │     │ waterproofing.    │    │ resist wear.      │
└───────────────────┘     └───────────────────┘    └───────────────────┘
Preserving your existing plumbing footprint delivers immediate financial savings. Relocating a main toilet soil stack or shifting copper supply lines across exterior framing can add $2,500 to $5,500 to your labor invoice without yielding a single square inch of functional floor space. Leaving major rough-ins intact preserves your renovation budget for visible, premium surface upgrades.
Next, cosmetic design work inevitably fails if the underlying structure deteriorates. Commercial-grade vapor barriers, uncoupling subfloor membranes, and correctly vented exhaust fans protect your framing from concealed structural rot and toxic mold.
Finally, prospective homebuyers pay premiums for clean, turnkey spaces. Overly tailored designs—such as loud patterned tiles, intricate mosaics, or unconventional neon color palettes—frequently narrow your pool of future buyers. Incorporating versatile bathroom remodel ideas that leverage neutral, solid surfaces, classic hardware, and universal accessibility features protects your daily living standard while maximizing your appraisal value.
Space-Maximizing Bathroom Remodel Ideas for Small & Mid-Sized Layouts
Small bathrooms present distinct physical constraints, but practical architectural adjustments can make a standard 40-square-foot room feel open, bright, and functional. When evaluating small bathroom remodel ideas, focus on maximizing open floor visibility and eliminating heavy visual barriers.
Floating Vanities and Pocket Doors
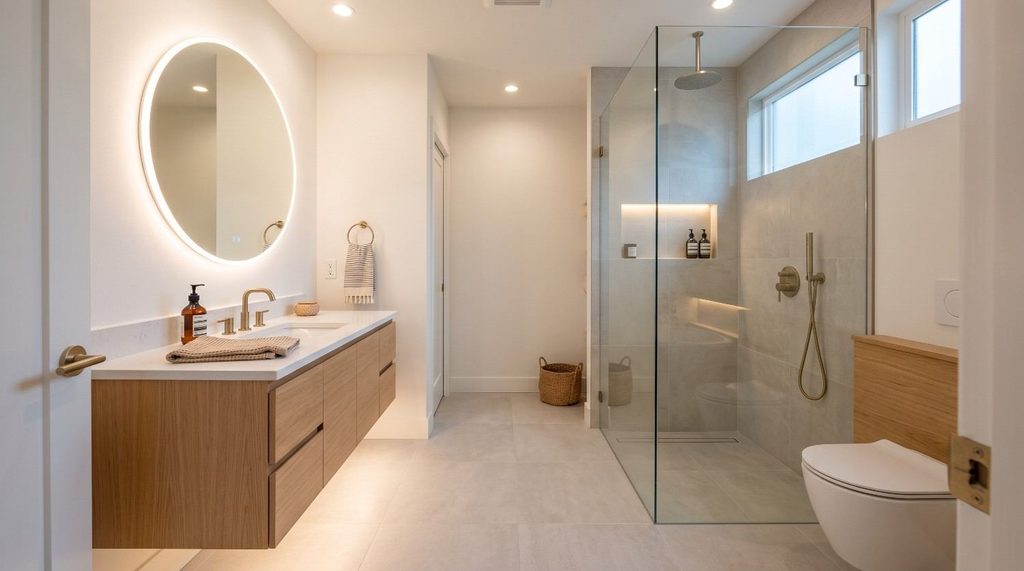
A wall-hung floating vanity design exposes continuous floor space underneath the cabinet box, leading the human eye to perceive a much broader room footprint.
- Mount the vanity cabinet 34 to 36 inches above the finished floor to maintain standard ergonomic height while leaving 8 to 10 inches of open clearance below.
- Run a hidden, low-voltage LED channel along the vanity base to produce soft ambient night lighting without harsh glare.
- Replace traditional swinging doors with an interior pocket door or solid sliding track. A conventional 32-inch door swing consumes roughly 9 to 14 square feet of functional floor clearance; eliminating that swing frees up wall area for dedicated towel warmers or recessed linen storage.
Large-Format Wall Tiles and Continuous Flooring
Using tiny mosaic tiles across every wall creates a dense grid of grout lines that visually fractures a small room.
- Transition to large-format porcelain tiles (such as 12×24-inch or 24×48-inch rectified slabs) on shower walls and main floors to minimize grout joints.
- Run the primary floor tile directly into a curbless shower pan without an elevated transition threshold.
- Match your grout shade closely to the base tile tone to produce an expansive, unbroken visual plane across the entire space.
Visual Impact: Standard Small Tile vs. Large-Format Tile

[  Small Tile Grid  ]            [ Large-Format Continuous ]
┌─┬─┬─┬─┬─┬─┬─┬─┬─┬─┐            ┌──────────────┬──────────────┐
├─┼─┼─┼─┼─┼─┼─┼─┼─┼─┤            │              │              │
├─┼─┼─┼─┼─┼─┼─┼─┼─┼─┤     VS     ├──────────────┼──────────────┤
├─┼─┼─┼─┼─┼─┼─┼─┼─┼─┤            │              │              │
└─┴─┴─┴─┴─┴─┴─┴─┴─┴─┘            └──────────────┴──────────────┘
 Busy, visually segmented                 Clean, open, seamless
Curbless Walk-In Showers & Frameless Glass Enclosures
Removing an aging fiberglass tub-and-shower insert in favor of a modern walk-in shower conversion instantly updates your home’s interior profile.
- Install a single stationary panel of 3/8-inch or 1/2-inch tempered frameless glass instead of framed sliding doors with metal bottom tracks that trap soap scum.
- Maintain a minimum 36×36-inch finished shower footprint (while 32×32 inches meets standard IRC residential building code, 36 inches provides vastly superior utility).
- Build a recessed shampoo niche between existing 16-inch-on-center wall framing studs, waterproofed with prefabricated foam inserts to keep products off the floor and away from sightlines.
Luxury & Comfort Upgrades That Deliver Value in Master Baths
When executing an expansive master bathroom remodel, concentrate your capital on tactile fixtures, intentional lighting layouts, and thermal comfort.
Freestanding Soaking Tubs vs. Dual-Showerhead Enclosures
Bulky 1990s jetted deck tubs waste usable square footage and prove exceptionally difficult to clean.
- Replace heavy tile decks with a sleek, flat-bottom acrylic or cast-resin freestanding soaking tub (standard 60- to 66-inch models fit most primary suites).
- If your household rarely takes baths and another tub exists elsewhere on the property, remove the master tub entirely to create an open wet-room format.
- Dedicate that reclaimed footprint to an oversized dual-head shower enclosure featuring an overhead rainfall fixture coupled with a handheld wand mounted on an adjustable vertical slide bar.
Strategic Layered Lighting (Task, Ambient, Accent)
Single, overhead vanity light strips cast downward shadows across your face, making shaving or makeup application difficult. Instead, construct a three-tiered lighting layout:
[Layer 1: Task Lighting]   ──>  Vertical wall sconces mounted at eye level (60"-65")
[Layer 2: Ambient Lighting]──>  Dimmable 2700K-3000K recessed ceiling cans (wet-rated)
[Layer 3: Accent Lighting] ──>  Hidden LED channels under vanities and inside niches
- Task Lighting: Position vertical wall sconces on both sides of the vanity mirror, mounted 60 to 65 inches above the finished floor, to cast balanced, shadow-free illumination across the face.
- Ambient Lighting: Add dimmable, slim-profile LED recessed ceiling fixtures (rated for wet locations) set to a warm 2700K to 3000K color spectrum with a 90+ Color Rendering Index (CRI).
- Accent Lighting: Wire low-voltage LED channels inside recessed shower niches and below floating vanities to provide soft nighttime illumination.
Smart Fixtures: Heated Floors, Thermostatic Valves, and Anti-Fog Mirrors
Modern bathroom remodel ideas increasingly integrate functional, invisible technology:
- Electric Radiant Floor Heating: Installing an electric heating cable system (such as Schluter-DITRA-HEAT or SunTouch) beneath your floor tile costs roughly $600 to $1,400 in materials. It delivers comfortable warmth during colder months while functioning as an uncoupling crack-isolation membrane.
- Thermostatic Shower Valves: Thermostatic valves regulate water temperature and flow volume independently, preventing sudden temperature drops when other household appliances draw water.
- Hardwired Anti-Fog Mirrors: Mirrors equipped with integrated LED perimeter backlighting and low-wattage defogger heating pads remain crystal clear throughout hot showers.
Bathroom Remodel Cost Breakdown: What You’ll Actually Spend
Understanding how your project scope aligns with labor and material pricing is critical before purchasing fixtures or soliciting contractor bids. The following cost projection outlines realistic pricing for standard full-bathroom renovations:
| Remodel Tier | Average Cost Range | Typical Scope & Fixtures Included | Estimated ROI |
| Budget / Cosmetic Refresh | $5,000 – $12,000 | Keeping existing layout; fresh paint; updated stock vanity and sink; modern plumbing trim kits; luxury vinyl tile (LVT) flooring. | 70% – 80% |
| Mid-Range Full Renovation | $15,000 – $30,000 | Complete gut to studs; porcelain floor and wall tile; frameless glass; semi-custom quartz vanity; new valve bodies; upgraded exhaust fan. | 65% – 75% |
| High-End / Luxury Master Suite | $35,000 – $75,000+ | Layout reconfiguration; custom curbless shower; freestanding soaking tub; dual-sink custom vanity; heated floors; premium stone finishes. | 45% – 55% |
Hidden Costs to Account For
Always set aside a 15% to 20% contingency reserve above your base construction contract to handle common behind-the-wall discoveries:
- Subfloor Moisture Damage: Slow, unnoticed leaks around old toilet flanges or shower curbs frequently rot subflooring, requiring plywood replacement and joist sistering before laying new tile.
- Plumbing Stack & Supply Line Upgrades: Homes with aging galvanized piping often require updating to modern PEX or copper to maintain proper pressure and code compliance.
- Electrical Service Demands: Adding dedicated radiant heat circuits, high-draw blow dryers, and exhaust fan warmers often requires pulling new 20-amp lines back to your main breaker panel.
- Municipal Permitting & Inspections: Structural adjustments, plumbing stack relocations, and new electrical circuits require building permits that can add $400 to $1,500 depending on local municipal fees.
High-ROI Upgrades vs. Overpriced Mistakes
Not every decorative dollar spent yields equal value upon appraisal. Prioritize high-value bathroom remodel ideas that experienced home appraisers and buyers favor:
HIGH-ROI UPGRADES                       OVERPRICED MISTAKES
(Spend Here)                           (Avoid or Scale Back)
──────────────────────────────────     ──────────────────────────────────
✔ Converting old tub to walk-in        ✖ Wall-to-wall luxury natural marble
  glass shower                           (demands constant maintenance)
✔ Dual-sink vanity in master baths     ✖ Eliminating the only bathtub
✔ Solid quartz countertops               in a family-oriented home
✔ Dedicated, high-CFM quiet venting    ✖ Jetted whirlpool tubs with pumps
✔ Neutral porcelain tile floors        ✖ Highly customized layout shifts
- Prioritize Engineered Quartz Over Natural Marble: Quartz delivers the visual elegance of marble without the vulnerability to acid etching, hair-dye staining, and seasonal chemical sealing.
- Maintain at Least One Bathtub on the Property: While converting a primary bath tub into a walk-in shower adds value, removing the only bathtub in a multi-bedroom house alienates future buyers with young children.
- Install Ultra-Quiet Mechanical Ventilation: A high-efficiency exhaust fan (rated under 1.0 sone with 80 to 110 CFM) wired to a digital humidity sensor protects walls and trim from mold, mildew, and peeling paint.
Step-by-Step Bathroom Remodeling Workflow (The Correct Sequence)
Following a structured construction workflow prevents accidental damage to newly installed fixtures and avoids costly structural rework.
[Phase 1: Demo & Framing] ──> [Phase 2: Rough MEP] ──> [Phase 3: Waterproofing]
                                                              │
[Phase 6: Trim & Hardware] <── [Phase 5: Fixtures] <── [Phase 4: Tile & Grout]
- Demolition and Structural Inspection: Strip old fixtures, wallboard, and flooring down to the bare studs and subfloor. Inspect structural members for water damage, levelness, and plumb alignment.
- Rough Plumbing, Electrical, and HVAC: Run new PEX supply lines, set the shower drain body, pull dedicated electrical circuits, and duct the exhaust fan through an exterior wall or roof cap.
- Subfloor Preparation and Waterproofing: Hang cement backer board or waterproof foam wall panels (such as Schluter-KERDI-BOARD or Wedi). Apply liquid or sheet waterproofing membranes across all wet zones and perform a mandatory 24-hour shower pan flood test.
- Tile Setting and Grouting: Lay floor tiles over an uncoupling membrane to prevent movement cracks. Set wall tile using modified thin-set mortar, pack the joints with stain-resistant epoxy or performance grout, and seal all internal plane changes with 100% color-matched silicone.
- Vanity, Tops, and Major Fixtures: Secure vanity cabinets directly into wall framing, install the quartz top with undermount sinks, and seat the toilet using an upgraded rubber or reinforced wax gasket.
- Trim Plumbing, Electrical, and Accessories: Mount shower trim plates, showerheads, faucets, light sconces, towel bars, and frameless glass enclosures.
DIY vs. Hiring Licensed Bathroom Remodeling Contractors
Distinguishing between manageable DIY tasks and critical structural work keeps your budget intact while preventing catastrophic moisture failures.
- Safe for Experienced DIY Homeowners:
- Selective demolition and debris disposal (saves $800–$1,500 in contractor labor).
- Drywall patching, priming, and painting using mildew-resistant interior coatings.
- Installing vanity mirrors, hardware pulls, towel bars, and decorative bath accessories.
- Swapping out existing vanity light fixtures (after confirming circuit power is off at the breaker).
- Requires Licensed Trades and General Contractors:
- Shower Pan Fabrication and Waterproofing: A pinhole failure in a shower membrane can lead to thousands of dollars in hidden framing rot and mold remediation.
- Main Drain Stack and Vent Relocations: Incorrect pipe pitches or improper wet venting siphons P-traps dry, allowing hazardous sewer gases into living areas.
- High-Amp Circuitry and GFCI Protection: Outlets and radiant heating mats in damp locations demand precise ground-fault protection to satisfy national electrical safety codes.
For extensive structural reconfigurations, load-bearing wall alterations, or full-home interior transformations, collaborating with established general contracting teams like SK Group NYC Corp ensures strict local building-code adherence, proper permitting, and enduring construction quality.
Frequently Asked Questions
What bathroom upgrades add the most value to a home?
The highest-ROI bathroom upgrades include converting outdated tub-and-shower combos into frameless walk-in showers, adding double-sink vanities with quartz countertops, installing neutral large-format porcelain tile, and improving task lighting. These improvements directly target the functional and storage priorities home appraisers and buyers value most.
How much does an average bathroom remodel cost in 2026?
A standard residential bathroom remodel costs between $14,000 and $28,000 for quality mid-range materials and licensed professional installation. Minor cosmetic refreshes can be accomplished for $5,000 to $10,000, while expansive, custom master suites with structural reconfigurations range from $35,000 to over $70,000.
How do I make a small bathroom look significantly bigger?
To make a small bathroom feel larger, install a wall-mounted floating vanity to expose more floor surface, use large-format wall tiles to minimize grout breaks, and choose a frameless glass shower panel. Implementing clean bathroom remodel ideas like replacing an inward-swinging door with a pocket door also reclaims roughly 10 square feet of usable clearance.
What is the most expensive part of a bathroom remodel?
Labor, plumbing reconfiguration, and custom tile installation represent the largest expense, accounting for 40% to 55% of the total project budget. Moving rough-in plumbing lines, fabricating custom waterproof shower pans, and quartz countertop fabrication make up the largest individual trade costs.
Final Thoughts on Bathroom Remodel Ideas
A successful renovation elevates your daily living standards while strengthening your property’s long-term market position. Implementing well-researched bathroom remodel ideas ensures you focus your budget on layout efficiency, high-grade waterproofing below the surface, and durable, neutral materials that withstand daily humidity and use.
Before starting demolition, finalize your spatial layout, order your materials to avoid project delays, and establish a firm budget with a dedicated contingency fund. When handling complex drainage lines or full-scale layout alterations, partnering with experienced residential remodeling professionals ensures your project remains code-compliant, structurally sound, and built to last.
Have Questions? Call Us Now!
+1 (718) 507-7000
We’re here to help quick answers, friendly service, anytime you need!
Contact SK Group NYC
🌐 Website: www.skgroupnyccorp.com
📍 Serving: Manhattan, Brooklyn, Queens, The Bronx, and Staten Island
📍 Address: 87-88 172nd St, Jamaica, New York, NY, United States, New York